Scenario Link to heading
Suppose your project has decided to use Log4Brains to record architectural decisions and now you need to make the resulting website available, in Microsoft Azure, via a CD Pipeline. To learn about ADRs or architectural decision records I highly recommend Steve Smith’s post about it.
Install Log4Brains and create your ADRs Link to heading
- Install Log4Brains’s prerequisites to which I will add VsCode, with the .md extension
- Install Log4Brains and follow the getting started guide. You should be able to preview the site, and create your own ADRs
Commit and push to AzDevOps Link to heading
It can be a new repository or the existing repository with the application. Before push ensure the output is being ignored via you .gitignore file:
# Log4Brains Output
.Log4Brains/
Add pipeline YAML File Link to heading
The location doesn’t really matter. It can be at / , or you can have a Pipelines or similar folder, the location and name of the file doesn’t really matter, what matters is the content:
trigger: none

pr: none

stages:
- stage: build
  displayName: 'Build'
  jobs:
  - job: build
    displayName: 'Build'
    pool:
      vmImage: 'ubuntu-latest'
    steps:
    - task: NodeTool@0
      inputs:
        versionSpec: '14.x'
      displayName: 'Install Node.js'
    - script: |
        npm install -g log4brains
        log4brains build
      displayName: 'Install and Build Log4brains'
    - task: CopyFiles@2
      displayName: 'Copy config to $(System.DefaultWorkingDirectory)/.log4brains/out'
      inputs:
        Contents: staticwebapp.config.json
        TargetFolder: '$(System.DefaultWorkingDirectory)/.log4brains/out'
    - task: PublishPipelineArtifact@1
      inputs:
        targetPath: '$(System.DefaultWorkingDirectory)/.log4brains/out'
        artifactName: staticSite

- stage: publish
  displayName: 'Publish'
  dependsOn: build
  jobs:
  - deployment: deployProd
    displayName: 'Deploy prod'
    environment: prod
    strategy:
      runOnce:
        deploy:
          steps:

          - task: DownloadPipelineArtifact@2
            displayName: Download static site artifact
            inputs:
              artifact: staticSite
              path: $(Build.SourcesDirectory)/staticSite

          - task: AzureStaticWebApp@0
            displayName: Upload to Azure Static WebApp
            inputs:
              app_location: /staticSite
              output_location: ""
            env:
              azure_static_web_apps_api_token: $(deployment_token)
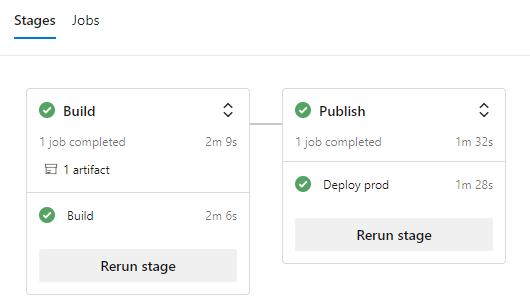
This is a multistage pipeline, where first we build the application, or in this case, run the Log4Brains static site generator to get the html/css output and make it available via Azure DevOps Artifacts, then the second stage pulls the artifact and publishes to Azure Static WebSites.
On the first stage we install node, install Log4Brains, run the build command to generate the output, then publish the output as an artifact. There is a CopyFiles task before the publish task, this task is to add a special config .json file to the output. This special file is not needed if you want your ADRs to be publicly available, however if you want to take advantage of the Azure Static Website authorization and authentication capability, you want to copy this file, which gets created in the next step.
The second stage pulls the artifact and calls the AzureStaticWebApp task to get the site published. The publish token is a pipeline variable that we will set later on the create pipeline step.
Git commit, git push, to make the file available in the repository.
Adding the Static Web Page configuration file Link to heading
Optional, only if don’t want your ADRs to be public. Azure Static Websites provide authorization and authentication capabilities which are configured via the staticwebapp.config.json file, and then adding authorized users via the Azure Portal.
I created the staticwebapp.config.json file in /, and configured it:
{
    "routes": [
        {
            "route": "/*",
            "allowedRoles": ["reader"]
        }],
    "responseOverrides": {
        "401": {
            "redirect": "/.auth/login/aad",
            "statusCode": 302
        },
        "404": {
            "rewrite": "/404.html"
        }
    }
}
What it says is that every route is only allowed to the “reader” role, and if a request comes from a not previously authenticated user, the request will be redirected to the Azure Active Directory authentication provider.
Git commit, git push, to make the file available in the repository.
Create an Azure Static Website Link to heading
No surprises here, the steps on the portal are very straight forward, and of course the CLI or a proper infrastructure as code pipeline will work as well.
Create an Azure DevOps Pipeline Link to heading
Again, no surprises, the steps on the guide are very clear, except for steps 3 and 4, instead of the starter pipeline, select Existing Pipeline and point to the YAML File created earlier, then proceed to the next steps that set the variable with the token and run the pipeline.

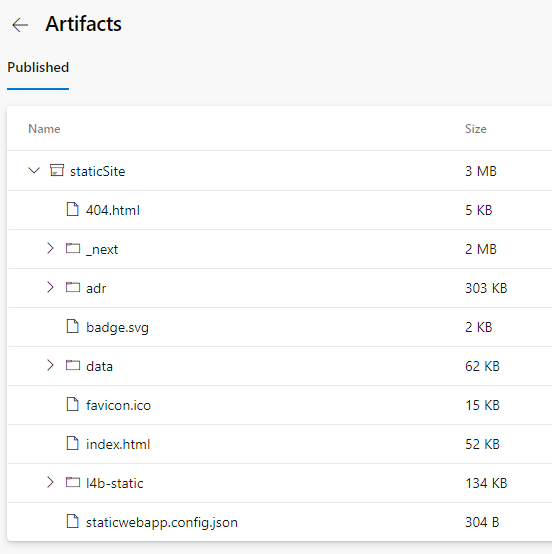
The artifacts link available in the pipeline output screen will allow you to verify the contents of the artifact, to ensure the index.html and the staticwebapp.config.json files are present, very useful for troubleshooting.

Invite users Link to heading
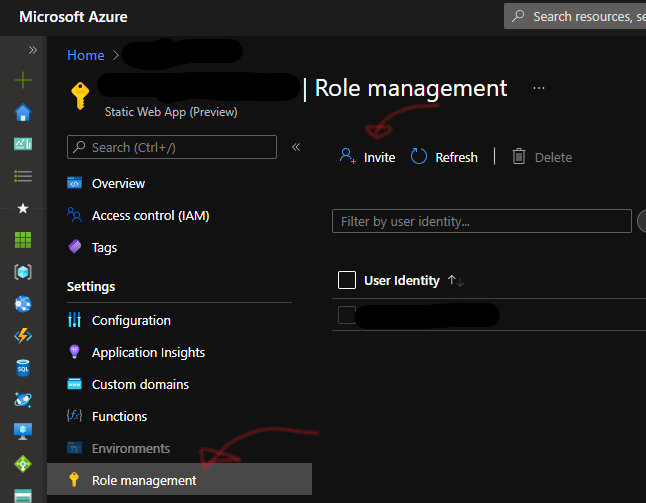
Navigate to the Azure Portal, to the Static Web Resource, click on Role management to invite users

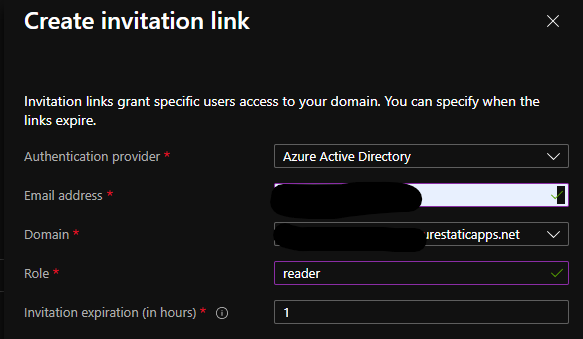
In the invite users dialog, use ‘reader’ as role. If you use any other role be sure to update the staticwebapp.config.json file accordingly.

Enjoy! Link to heading
And with that, the site is available, with user authentication in place. The pipeline trigger can be updated so that every time a new ADR is checked in the pipeline runs automatically.