Visual Studio Code Remote enables scenarios where the editing happens on the client machine, but all the processing, build and dependencies happen somewhere else.
This is great for situations where the software being build requieres some specific setup that conflicts with your current machine or operating system, or to provide isolation between different projects or development environments, or to have access to more performant hardware or better internet connection, for the build, pulling dependencies, pushing containers, pulling docker images and many other scenarios where your local machine is not ideal.
A similar solution already exists, called Visual Studio Codespaces, which works pretty well but its being transitioned to a new home, in GitHub, and at the time of this blog post it is still in private preview. A great discussion about it is available here.
The specific scenarios for which this technology is a great time saver for me are:
Build environments isolation Link to heading
Different projects have different needs, and often those needs collide, different version, different system configurations. With this technology I can have a specific remote for linux-phyton, linux-go, linux-dotnetcore, or even more specific, by version or project, having a trusted build environment for that specific need
High bandwidth requirements Link to heading
Living outside the city has many adventages, but broadband is not one of them, so if my productivity depends on downloading several docker images, pushing containers, or having very good connectivity in general, then I’m not productive, however with this technology all of that happens on the remote, where the bandwith is not a problem
Setting it up Link to heading
While the steps to set this up are already documented here, this blog post goes over some of the details to make it work. For this, I created a new environment, on the client side I created a new Windows 10 Pro VM, and for the remote, a CentOS VM, both in Azure. Of course the idea of the client is to use your own computer, I created a new VM to see it work from scratch and being able to document all the steps.
I created the Windows VM from the portal in a new resource group called remotevs, for the Linux VM I used Azure CLI from the cloud shell in the portal:
az vm create --resource-group remotevs --name remotevsserver --image OpenLogic:CentOS:7.7:7.7.2020062400 --admin-username azureuser --generate-ssh-keys
Here I used the CentOS image just because I’m studying for the Linux Foundation certification, any other image should work fine as happens with the one I use to build this blog which is based in Ubuntu.
Once the VMs were running I opened a remote desktop session on the Windows machine, and installed Visual Studio Code. Right after that I clicked on the link to get the SSH Extension, and got it installed on VSCode
The documentation indicates that an SSH Client is needed on the client, and links to OpenSSH for Windows, which can be added via the user interface or via PowerShell, which I did

Add-WindowsCapability -Online -Name OpenSSH.Client~~~~0.0.1.0
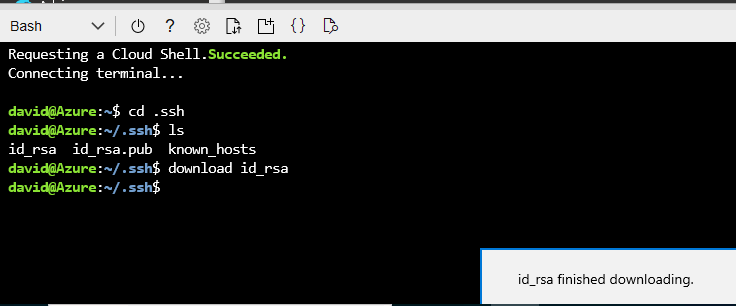
And now what is missing is the SSH Key. In the documentation, it is suggested to first create a key pair, and then use that public key during the virtual machine creation. That certainly works, the way I did it however, with the generate-ssh-keys parameter, means that the public and private keys are there in the cloud shell. I need to copy those keys to the client for the authentication to work.
To copy the files, I opened a cloud shell again, this time on the client machine, found the files, and then copy using the download command

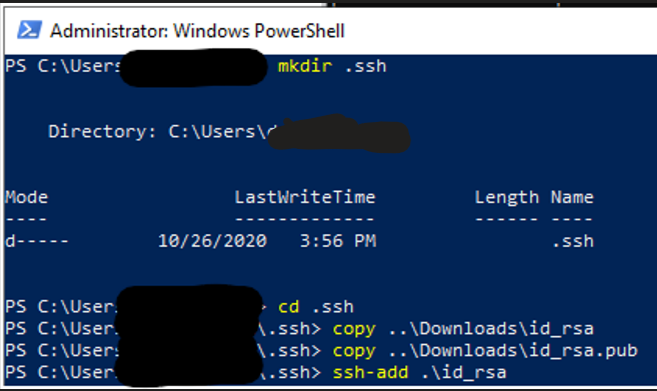
And now move them in the client file system to the expected location

The name id_rsa is a default name, and if this is your client machine you might already have one. Its fine to rename it, but the filename will need to be passed explicitly to the ssh command, and also be set explicitly in the VSCode configuration.
If the add-ssh command fails with
Error connecting to agent: No such file or directory
Its because the ssh-agent service is not running. To start it in PowerShell
Get-Service -Name ssh-agent | Set-Service -StartupType Manual
Start-Service ssh-agent
As described here
With the private key in place is time for a test

And now that I know my client is able to SSH to the remote, its time for VSCode to do the same


In case the private key file has a different name, as happens to me with the one for the blog, the connection will fail and the extension will allow to edit the configuration, which is a text file. On that text file, you can provide the path and name of the private key file, in my case for example:
Host hugoblog
  HostName hugoblog
  User azureuser
  ForwardAgent yes
  IdentityFile ~/.ssh/hugoblog
Next steps Link to heading
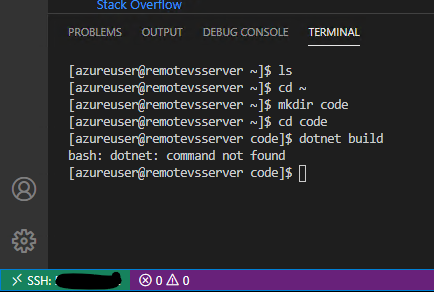
Depending on the purpose of the remote you will need to apt-get update, configure git, install dotnet core, install python, install Azure CLI …
And something that works without explicit configuration is port forwarding, in the case of my blog I can browse it locally, as if it was running locally but in realilty is being port-forwarded from the remote. This works with dotnet core as well.
Have fun!
